
Sun Apr 06 - Written by: Denis Maina
13 Must-Try Garden Layout Ideas for Vegetable and Flowerbeds
Ready to transform your backyard into a thriving garden oasis? Whether you're working with a tiny urban plot or a sprawling suburban yard, the right garden layout can make all the difference in your growing success.
Creating a well-planned garden isn’t just about putting plants in the ground – it’s about making smart use of your space while keeping things beautiful and practical. From classic raised beds to modern vertical gardens, you’ll find plenty of inspiration in these tried-and-tested layout ideas that’ll help you grow more food and flowers in less space.
Let’s look at 13 garden layouts that’ll work wonders for both your vegetables and flowerbeds. These designs mix beauty with function so you can enjoy fresh harvests and gorgeous blooms all season long.
Selecting the Perfect Garden Location: Sun, Shade, and Soil Considerations
Your garden’s success starts with choosing the right location that meets your plants’ basic needs for light and soil quality.
Understanding Light Requirements
Most vegetables and flowering plants need 6-8 hours of direct sunlight daily to thrive. Track the sun’s movement across your yard for a few days to identify the sunniest spots. South-facing areas typically get the most sun while north-facing locations receive less light. Create a simple sun map by marking sunny spots at different times (morning noon and late afternoon).
Pay attention to nearby structures trees and buildings that cast shadows. Some plants like lettuce spinach and hostas actually prefer partial shade making them perfect for areas that get 4-6 hours of filtered sunlight. Match your plants’ light requirements to your garden’s available sunshine patterns for the best growing results.
Evaluating Soil Quality
Start by checking your soil’s texture by grabbing a handful when it’s slightly damp. Good garden soil should hold its shape when squeezed but crumble easily when poked. Look for soil that’s dark rich and full of organic matter. Test your soil’s pH using an inexpensive home testing kit – most vegetables grow best in soil with a pH between 6.0 and 7.0.
Watch how water drains after rain. If water pools for more than 24 hours you’ll need to improve drainage. Add 2-3 inches of compost annually to boost soil quality fix drainage issues and provide nutrients. Consider building raised beds if your native soil is particularly challenging to work with.
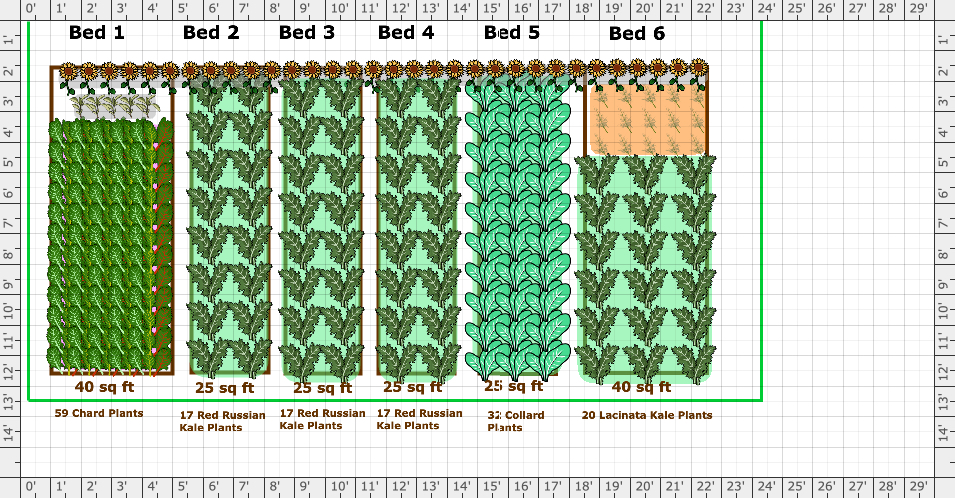
Creating a Traditional Row Garden Layout
Advertisement
The traditional row garden layout remains a time-tested favorite among home gardeners for its simplicity and easy maintenance.
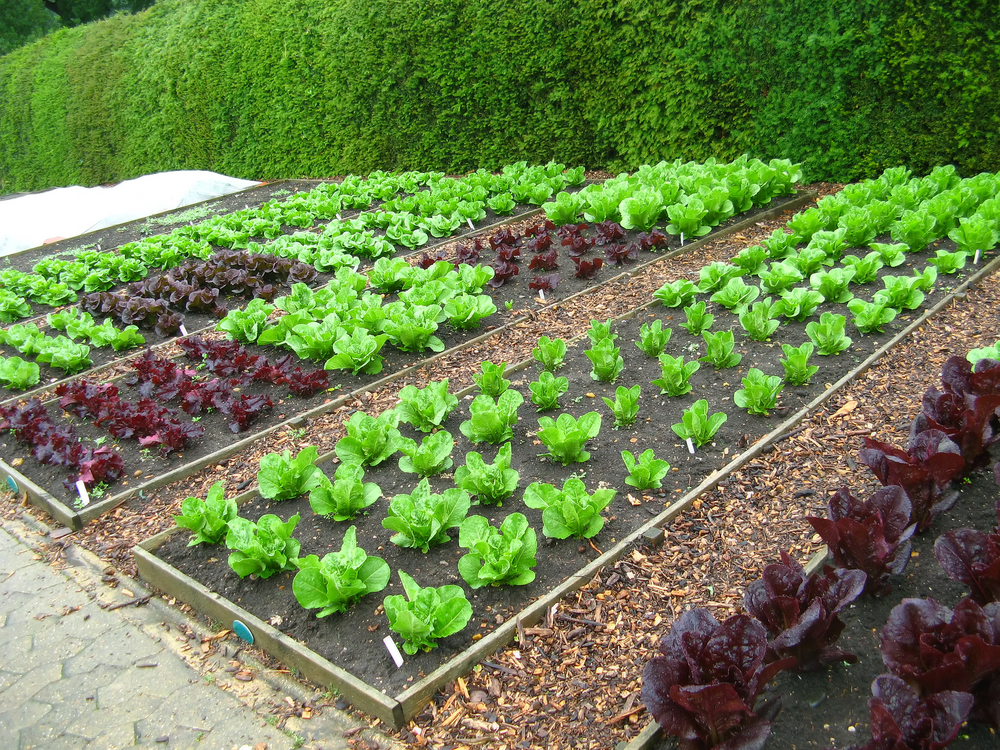 Traditional row garden with straight, organized vegetable plantings. Source: Rural Sprout
Organizing Crops by Height
Start by placing your tallest crops like corn trellised tomatoes and pole beans at the northern end of your garden. This strategic placement prevents tall plants from shading shorter ones. Plant medium-height vegetables like bush beans peppers and eggplants in the middle rows. Reserve the southern-most rows for your low-growing crops such as lettuce carrots radishes and herbs. This height-based arrangement ensures all your plants get adequate sunlight throughout the growing season. For vining plants like cucumbers and peas install trellises or supports at planting time to avoid disturbing the roots later.
Maximizing Space Between Rows
Leave 18-24 inches between rows for compact plants and 30-36 inches for larger vegetables. These paths give you enough room to navigate with a wheelbarrow or garden cart while tending to your plants. Consider creating wider paths (about 3 feet) for main garden walkways to accommodate maintenance tasks like weeding and harvesting. You’ll want to space plants within each row according to their mature size – for example 12 inches for tomatoes and 4 inches for carrots. Use a measuring tape or garden ruler when planting to ensure proper spacing which helps prevent overcrowding and disease issues later in the season.
Designing a Square Foot Garden Grid
A square foot garden maximizes growing space by dividing your garden bed into manageable 1×1 foot squares. This efficient method lets you grow more vegetables in less space while keeping your garden organized.
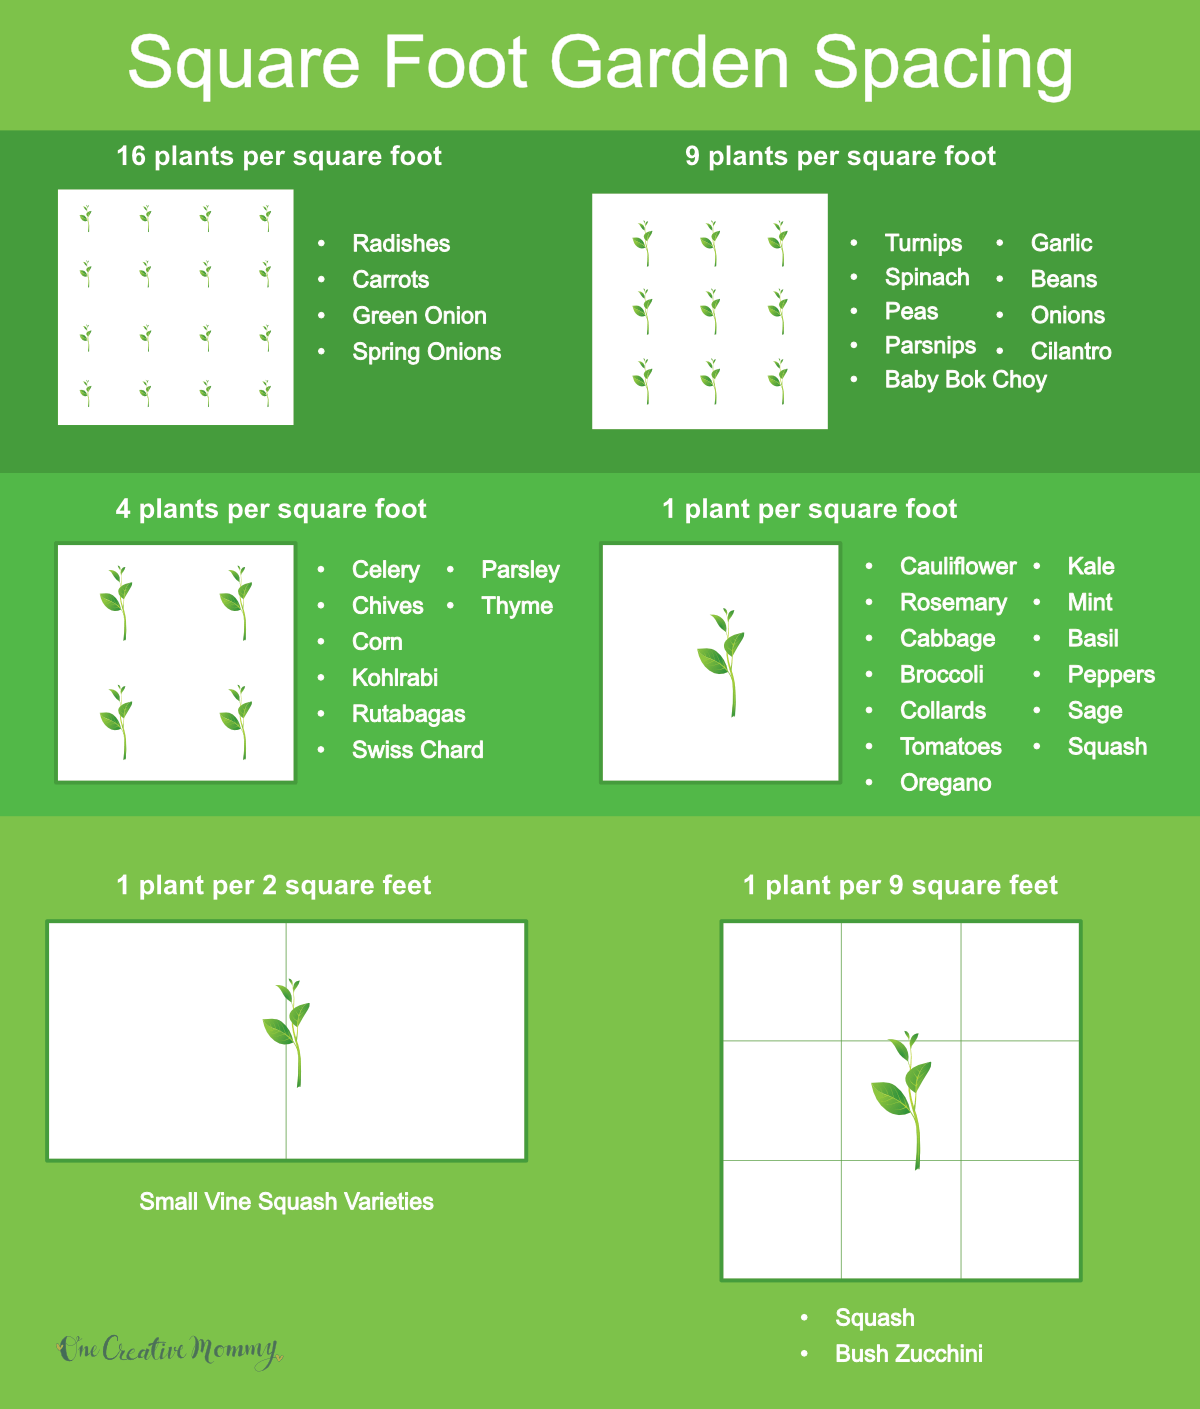 Square foot garden grid layout showing proper plant spacing. Source: One Creative Mommy
Planning Plant Spacing
Square foot gardening works best with a 4×4 foot raised bed divided into 16 equal squares. Here’s how to space different plants:
- Plant large vegetables like tomatoes broccoli and cabbage one per square
- Grow medium-sized plants like lettuce swiss chard and bush beans – 4 per square
- Add 9 small plants like spinach beets and bush peas in each square
- Sow 16 very small crops like radishes carrots and onions per square
Use thin strips of wood or string to create your grid markers. This visual guide helps maintain proper spacing throughout the growing season and prevents overcrowding.
Companion Planting Benefits
Strategic plant pairing in your square foot garden can boost growth and deter pests:
- Plant marigolds next to tomatoes to repel harmful nematodes
- Grow basil near peppers to improve their flavor and growth
- Add nasturtiums by cucumbers to deter squash bugs and aphids
- Pair carrots with onions to confuse carrot flies
- Plant pole beans near corn to add nitrogen to the soil
This intensive planting method also helps reduce weeds by covering more soil surface. You’ll save water too since plants shade the soil and reduce evaporation. Remember to rotate plant families between squares each season to prevent soil depletion and disease buildup.
Building Raised Garden Bed Formations
Advertisement
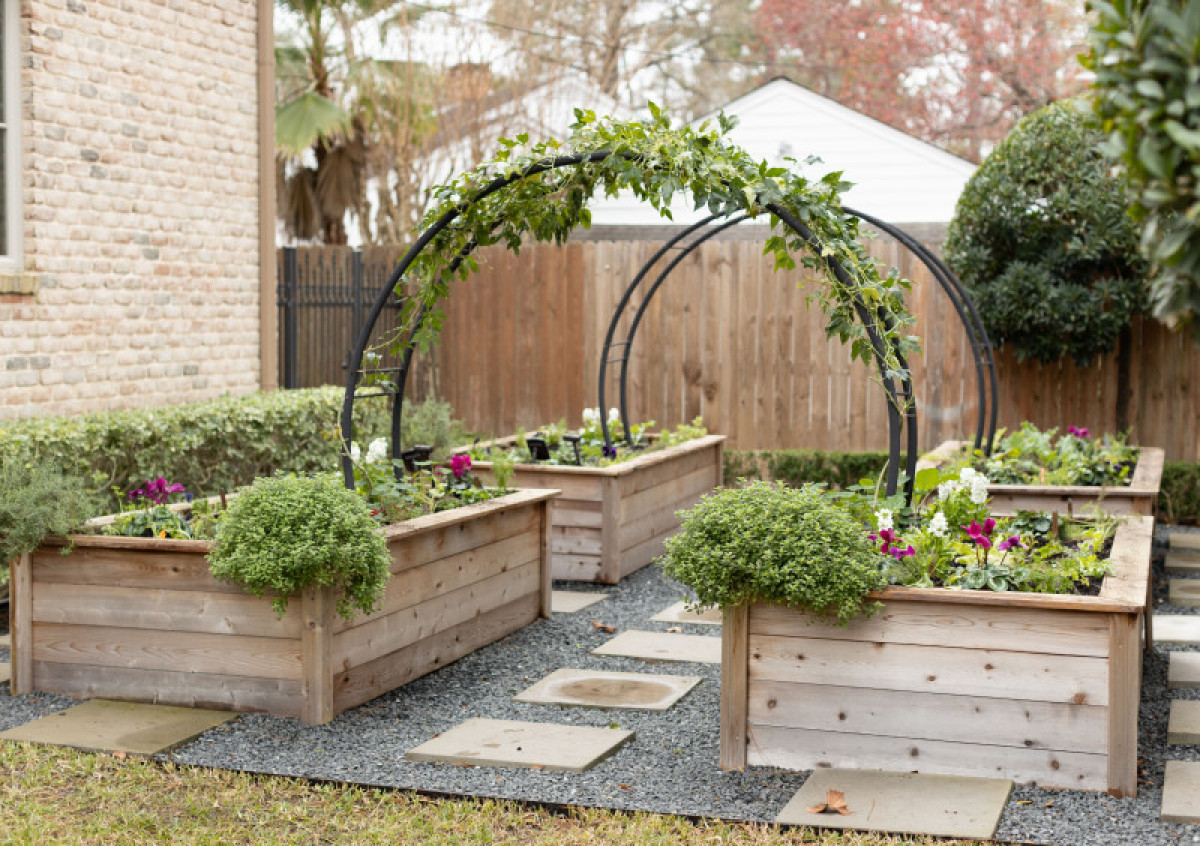
Raised garden beds offer better soil control drainage and easier maintenance while adding visual interest to your garden space.
Beautiful raised garden beds made from natural redwood. Source: Homestead and Chill
Multi-Level Garden Beds
Multi-level garden beds create stunning visual impact while maximizing your growing space. Start by building a series of beds at different heights ranging from 6 inches to 3 feet tall. Position taller beds toward the back and shorter ones in front to create a theater-style effect that makes plant care easier. This formation works great for sloped yards where you can integrate the natural terrain into your design. Try growing root vegetables in deeper beds trailing plants in middle sections and herbs or shallow-rooted flowers in the front beds. Add stepping stones between levels to prevent soil compaction while accessing your plants.
Accessible Gardening Layouts
Design your raised beds with accessibility in mind by keeping them 24-36 inches wide so you can reach the center from either side. Build the bed walls 24-30 inches high to minimize bending and create comfortable seating edges for garden tasks. Leave 36-inch wide paths between beds to accommodate wheelchairs gardening tools and wheelbarrows. U-shaped or keyhole layouts let you access plants from three sides while saving space. Consider adding a potting bench nearby at standing height and installing a drip irrigation system to make watering effortless. These smart design choices make gardening easier on your back and more enjoyable overall.
Implementing a Circular Garden Design
Circular garden designs create a striking visual impact while maximizing space efficiency through their natural flow and symmetry.
 Circular mandala garden with concentric rings and radiating pathways. Source: Gardening Know How
Mandala Garden Patterns
Transform your garden into a stunning mandala design by arranging plants in concentric circles with radiating pathways. Start with a central focal point like a sundial or birdbath then divide your circle into 6 or 8 equal sections using gravel paths. Plant tall flowers or vegetables in the center rings then gradually decrease plant height as you move outward. Mix flowers like marigolds cosmos and zinnias with vegetables such as peppers lettuce and bush beans. Create eye-catching patterns by alternating plant colors textures and heights in each section. This layout typically spans 6-12 feet in diameter making it perfect for medium-sized yards.
Spiral Herb Garden Layouts
Build an herb spiral that rises from ground level to about 3 feet high creating multiple microclimates in a compact space. Start with a 6-foot diameter base using bricks or stones to form a gradually ascending spiral. Plant moisture-loving herbs like mint and watercress at the bottom where water naturally collects. Position Mediterranean herbs like thyme and rosemary at the top where drainage is best. Place basil sage and parsley in the middle sections. This space-saving design lets you grow 20-30 herb varieties in just 50 square feet. Add vertical interest by incorporating cascading herbs like creeping thyme along the edges.
 Herb spiral planting diagram showing how to arrange different herbs based on water needs. Source: Backyard Harvest Project
Establishing a Kitchen Garden Layout
Advertisement
Design your kitchen garden to combine fresh herbs vegetables and edible flowers in an easily accessible space near your home’s cooking area.
 Beautiful kitchen garden layout with raised beds and organized planting areas. Source: Gardenary
Culinary Herb Placement
Position your most-used herbs like basil parsley and thyme within arm’s reach of your kitchen door. Create a dedicated herb zone using containers window boxes or raised beds alongside your walking path. Keep invasive herbs like mint and oregano in separate pots to prevent them from taking over. Group herbs with similar water needs together – Mediterranean herbs like rosemary sage and lavender prefer drier conditions while cilantro and chives need more moisture. Include stepping stones between herb patches so you can easily snip fresh herbs while cooking.
Easy-Access Vegetable Plots
Plan your vegetable beds in a U-shape or L-shape around a central path for quick harvesting. Place salad greens Swiss chard and other frequently harvested veggies closest to your home. Create 3-4 foot wide beds so you can reach the center from either side without stepping in the soil. Install mulched pathways at least 2 feet wide between beds for comfortable navigation with garden tools or harvest baskets. Add vertical elements like tomato cages and cucumber trellises along the back of the beds to maximize growing space while maintaining easy access.
Installing Vertical Garden Structures
Vertical gardening maximizes your growing space by utilizing walls fences and overhead structures. This space-saving approach lets you grow more plants in limited areas while creating stunning visual displays.
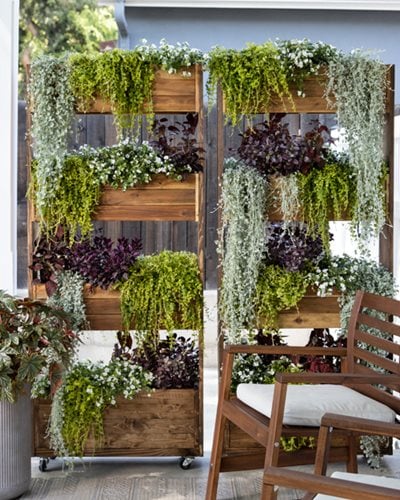 Vertical garden structure that maximizes growing space with beautiful trailing plants. Source: Garden Design
Wall-Mounted Growing Systems
Transform bare walls into thriving gardens with pocket planters hanging containers and modular panel systems. Mount waterproof fabric pockets directly to your fence or wall to create a living tapestry of herbs leafy greens and trailing flowers. For a more structured look try installing horizontal rails that support removable planting boxes perfect for seasonal rotations. Consider using self-watering systems with built-in reservoirs to maintain consistent moisture levels and reduce maintenance time. Remember to secure all mounting hardware into wall studs or use appropriate anchors to support the weight of soil plants and water.
Trellis and Support Planning
Start your trellis setup early in the season before plants need climbing support. Install sturdy posts 2 feet deep with concrete footings then attach mesh panels cattle panels or wooden lattices for maximum stability. Space your supports 6-8 feet apart to create growing zones for climbing vegetables like peas cucumbers and pole beans. Add horizontal guide wires every 12 inches to help train vining plants upward. For flowering vines like clematis or morning glories use decorative metal arches or wooden pergolas to create stunning overhead displays. Always position trellises on the north side of your garden to prevent shading other plants.
Developing a Four-Season Garden Plan
Advertisement
Transform your garden into a year-round growing space by planning for each season’s unique conditions and opportunities.
 Four-season garden plan showing seasonal planting zones and rotation. Source: GrowVeg.com
Rotating Crop Sections
Create distinct garden zones to rotate your crops effectively throughout the year. Start by dividing your garden into four main sections based on plant families: nightshades (tomatoes peppers) legumes (peas beans) brassicas (cabbage broccoli) and root crops (carrots beets). Move each plant family to a new section every growing season to prevent soil depletion and reduce pest problems. This rotation system helps maintain soil fertility as different plants use varying nutrients. For example place heavy feeders like tomatoes in areas where nitrogen-fixing peas grew the previous season. Keep a garden journal to track your rotation schedule and mark each section with weather-resistant labels for easy reference.
Seasonal Planting Zones
Map out your garden to include dedicated zones for each growing season. Plant cold-hardy vegetables like kale spinach and root crops in north-facing beds for extended fall and winter harvests. Reserve south-facing areas for heat-loving summer crops such as tomatoes peppers and eggplants. Create transitional zones for spring and fall crops like peas lettuce and broccoli. Install cold frames or hoop houses in strategic locations to extend your growing season. Add permanent herb beds near the kitchen door for year-round access and position perennial flowers along borders to maintain visual interest through all seasons. Remember to leave space for succession planting so you’ll have continuous harvests of your favorite crops.
Creating a Potager Garden Design
A potager garden combines beauty with practicality by blending ornamental and edible plants in an aesthetically pleasing design that draws inspiration from French kitchen gardens.
 Beautiful potager garden combining ornamental and edible plants. Source: Gardeners’ World
Mixing Flowers and Vegetables
Create stunning garden beds by interplanting flowers with your vegetables. Place tall dahlias or sunflowers as dramatic focal points while shorter marigolds or nasturtiums work as colorful borders. Boost your garden’s productivity by adding pollinator-friendly flowers like zinnias cosmos and borage throughout vegetable rows. These flowers not only attract beneficial insects but also add splashes of color between your tomatoes peppers and leafy greens. Consider planting herbs like purple basil or bronze fennel that offer both visual interest and culinary value.
Ornamental Edible Layouts
Design your potager with geometric patterns using decorative vegetables as key elements. Plant rainbow chard and red-leaf lettuce in diamond patterns or create circular beds with purple cabbage as centerpieces. Line pathways with dwarf fruit trees or flowering herbs like lavender and sage. Add structure with ornamental features like obelisks covered in scarlet runner beans or create eye-catching patterns using different colored lettuces. Incorporate edible flowers like calendula pansies and bachelor’s buttons between vegetables to create a cohesive look that’s both beautiful and productive.
Planning a Container Garden Array
Advertisement
Container gardens offer flexible growing solutions for any space while adding visual interest through creative arrangements and portable designs.
:max_bytes(150000):strip_icc()/102138928_preview-2000-557743471643439d97b80a540fc6f005.jpg) Beautiful patio container garden arrangement with varied heights and plant types. Source: Midwest Living
Beautiful patio container garden arrangement with varied heights and plant types. Source: Midwest Living
Patio Garden Arrangements
Create a stunning container garden display by grouping pots of different heights and sizes. Place larger containers (24-36 inches) at the back or corners of your patio to anchor the space with tall plants like tomatoes or ornamental grasses. Position medium-sized pots (12-18 inches) filled with peppers herbs or compact flowers in the middle area. Line the edges with smaller containers (6-10 inches) featuring trailing plants like strawberries or cascading flowers. Consider using vertical space with hanging baskets or wall-mounted planters to maximize your growing area. Arrange containers in odd-numbered groupings (3 5 or 7) to create visual harmony and ensure each plant receives adequate sunlight.
Moveable Garden Solutions
Design your container garden with mobility in mind by using lightweight pots or adding wheels to larger planters. Select containers with built-in casters or place heavy pots on rolling plant stands to easily adjust their position throughout the season. Group plants with similar water needs together on wheeled garden carts or tiered plant trolleys for efficient maintenance. Use self-watering containers to reduce the weight of soil and water while making your mobile garden easier to manage. Position heat-loving plants like tomatoes and peppers on wheeled platforms to chase the sun or move them to shelter during harsh weather. This flexible approach lets you optimize growing conditions and rearrange your garden layout as needed.
Incorporating Permaculture Principles
Transform your garden into a self-sustaining ecosystem by applying permaculture principles that work with nature rather than against it. These methods create resilient gardens that need less maintenance while producing more yield.
 Permaculture design principles diagram showing integrated systems approach. Source: Daily Harvest Designs
Guild Planting Systems
Create garden guilds by grouping plants that naturally support each other’s growth and survival. Start with a central tree or large plant as your anchor then surround it with compatible companions. For example pair fruit trees with nitrogen-fixing plants like clover underneath pollinator-attracting flowers like lavender and pest-deterring herbs like marigolds. Build your guild in layers with tall plants shade-tolerant shrubs ground covers and root crops working together. This mimics natural forest systems where each plant serves multiple functions: providing nutrients improving soil structure attracting beneficial insects and creating micro-climates for optimal growth.
Sustainable Garden Zones
Design your garden in zones based on how frequently you need to access different areas. Place Zone 1 items like herbs and salad greens closest to your house for easy daily harvesting. Position Zone 2 with frequently visited elements like annual vegetables and small fruit trees within easy reach. Create Zone 3 for crops that need weekly attention like larger fruit trees and perennial vegetables. Use Zone 4 for low-maintenance items like nut trees and native plants. This strategic layout saves time and energy while ensuring every plant gets the care it needs. Add water-collection features like swales and rain gardens to naturally irrigate your zones.
Designing a Three Sisters Garden
Advertisement
Create a traditional companion planting system that combines corn, climbing beans and squash in a harmonious growing arrangement. This time-tested Native American method maximizes space while providing natural support and soil enrichment.
 Three Sisters companion planting technique showing corn, beans, and squash growing together. Source: Wikipedia
Native American Planting Methods
Transform your garden with the ancient Three Sisters planting technique that indigenous peoples perfected over generations. Start by creating mounds about 4 feet apart with 4-5 corn seeds planted in a circle at the center of each mound. Once your corn reaches 6 inches tall plant 4 pole bean seeds around each stalk then add 3 squash seeds between the mounds 2 weeks later. This strategic timing ensures each plant can establish itself without competing for resources. The Iroquois and other tribes used this method to grow food sustainably while preserving soil fertility across seasons.
Companion Growth Benefits
Each sister in this planting trio plays a unique role in supporting the others’ growth. The tall corn provides natural stakes for your climbing beans while the beans fix nitrogen in the soil to feed the corn and squash. Your squash plants create living mulch with their broad leaves shading the soil to retain moisture and prevent weeds. The spiny squash vines also deter pests like raccoons from raiding your corn. This symbiotic relationship yields more food in less space compared to growing these crops separately. Plus you’ll need minimal additional fertilizer since the beans continuously enrich the soil throughout the growing season.
Adding Garden Path Networks
Well-planned garden paths create essential connections between different garden areas while making maintenance and harvesting easier.
 Beautiful garden path network integrating stone and grass. Source: Landscaping Network
Functional Access Routes
Create primary paths that are at least 36 inches wide to accommodate wheelbarrows and garden carts. Place these main routes between key garden areas like your tool shed vegetable beds and compost bins. Use sturdy materials like gravel crushed stone or stepping stones that can handle heavy foot traffic and garden equipment. Add secondary paths that are 24 inches wide between garden beds for easy harvesting access. Make sure to angle paths slightly to promote proper drainage and prevent water pooling. Install landscape fabric underneath your paths to prevent weeds from growing through the material.
Decorative Walkway Designs
Transform your garden paths into eye-catching features with creative materials and patterns. Try laying brick pavers in a herringbone design or arrange flagstones in a flowing curved pattern. Add visual interest by planting low-growing herbs like creeping thyme or Roman chamomile between stepping stones. Edge your paths with drought-tolerant plants such as lavender or ornamental grasses to soften the transitions. Consider installing solar-powered path lights to illuminate walkways after dark. Mix materials like wooden rounds with gravel sections to create engaging texture variations. Remember to match your path design with your overall garden style whether it’s formal cottage or contemporary.
Conclusion: Choosing Your Ideal Garden Layout
Advertisement
Start with your available space and sunlight conditions to pick the perfect layout. Consider your gardening goals whether you want fresh vegetables herbs or beautiful flowers. Factor in your time commitment and physical abilities when selecting between raised beds container gardens or traditional rows. Remember there’s no one-size-fits-all solution mix and match these layouts to create your dream garden space.